Tomcat and Apache Setup
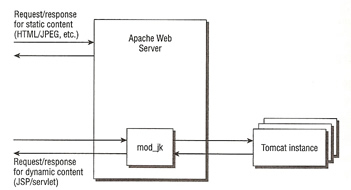
Most Tomcat configurations are a Apache/Tomcat setup, Apache serving up the static content and then passing any JSP to Tomcat to process. Tomcat can be integrated with Apache by using the JK Connector. The JK Connector uses the Apache JSserv Protocol (AJP) for communications between Tomcat and Apache.The AJP Connector
The AJP protocol is used for communication between Tomcat and Apache, the software modules used on Apache are mod_jk or mod_proxy. Both are native code extension modules written in C/C++, on the Tomcat side the software module is the AJP Connector written in Java.
The below diagram shows how the native code Apache module (mod_jk or mod_proxy) works with Tomcat. Apache will receive the incoming JSP or servlet request and using the Apache module will pass this request via the AJP protocol to Tomcat, the response will also be sent back to the Apache server via the AJP protocol.
The Apache JServ Protocol (AJP) uses a binary format for transmitting data between the Web server and Tomcat, a network socket is used for all communication. The AJP packet consist of a packet header and a payload, below is the structure of the packet
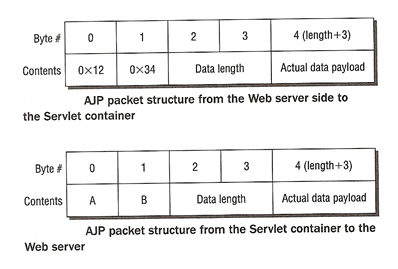
As you can see, the binary packet starts with the sequence 0X1234, this is followed by the packet size (2 bytes) and then the actual payload. On the return path the packets are prefixed by AB (the ASCII codes for A and B), the size of the packet and then the payload.
The major feature of this protocol are
- Good performance on fast networks
- Support for SSL, encryption and client certificate
- Support of clustering by forwarding requests to multiple Tomcat 6 servers
The configuration of a AJP Connector is below
| AJP Connector example |
A worker represents a running instance of Tomcat, a worker serves the requests for all dynamic web components. However you can run multiple instances of Tomcat in a cluster to implement load balancing or site partitioning. Each worker is identified by a unique hostname or a unique IP address and port number. You may what to implement multiple workers for the following reasons
- When you want different Web application contexts to be served by different Tomcat workers
- When you want different virtual hosts to be served by different Tomcat workers
- When you want to service more requests than the capacity of a single physical server
Worker List | |
| Attribute | Description |
| work.list | Describe the workers that are available to Apache via a list |
Worker Types | |
| Attribute | Description |
| ajp13 | This type of worker represents a running Tomcat instance |
| lb | used for load balancing |
| status | display useful information about how the load among the various Tomcat workers is distributed |
| jni | Used in process, this worker handles the forwarding of requests to in-process Tomcat workers using JNDI |
| ajp12 | worker that support the AJP 1.2 protocol |
Other Worker Properties | |
| Attribute | Description |
| worker.test1.type | Describes the type of worker (see above for types) |
| worker.test1.host | The host where the worker Tomcat instance resides |
| worker.test1.port | The port the AJP 1.3 Connector Tomcat instance is listening on (default 8009) |
| worker.test1.connection_pool_size | The number of connections used for this worker to be kept in a connection pool |
| worker.test1.connection_pool_minsize | The minimum number of connections kept in a connection pool |
| worker.test1.connection_pool_timeout | The number of seconds that connections to this worker should be left in the connection before expiry |
| worker.test1.mount | The contexts paths that are serviced by the worker, you can also use the JkMount directive in the http.conf file |
| worker.test1.retries | Controls the number of times mod_jk will retry when a worker returns a error |
| worker.test1.socket_timeout | controls how long a worker will wait for a response on a socket before indicating an error |
| worker.test1.socket_keepalive | indicates if the connection to the worker should be subject to keep alive |
| worker.test1.lbfactor | An integer indicating the local-balance factor used by the load balancer to distribute work between multiple instances of Tomcat. |
Worker Loading Balancing Properties | |
| Attribute | Description |
| worker.bal1.balance_workers | A list of workers to load balance between |
| worker.bal1.lock | The type of locking used O (Optimistic) or P (Pessimistic) |
| worker.bal1.method | can be set to R (Requests), T (Traffic), B (Busy-ness) R = The worker to use is based on the number of requests forwarded T = The worker to use is based on the traffic that had been sent to the workers B = The worker to use is based on the load dividing the number of concurrent requests by the load factor |
| worker.bal1.secret | Sets a default secret password for all workers |
| worker.bal1.sticky_session | Tells the mod_jk to respect the sessionID in the request and ensures that the same session is always serviced by the same worker instance. |
| worker.bal1.sticky_session_force | This is used for failover |
Example | |
| Simple example | worker.list = worker1 worker.worker1.type = ajp13 worker.worker1.host = 192.168.0.1 worker.worker1.port = 9009 worker.worker1.connection_pool_size = 5 worker.worker1.connection_pool_timeout = 300 |
| Load Balancing example | worker.list = loadbal1,stat1 worker.tomcatA.type = ajp13 worker.tomcatA.host =192.168.0.1 worker.tomcatA.port = 8009 worker.tomcatA.lbfactor = 10 worker.tomcatB.type = ajp13 worker.tomcatB.host =192.168.0.2 worker.tomcatB.port = 8009 worker.tomcatB.lbfactor = 10 worker.tomcatC.type = ajp13 worker.tomcatC.host =192.168.0.3 worker.tomcatC.port = 8009 worker.tomcatC.lbfactor = 10 worker.loadbal1.type = lb worker.loadbal1.sticky_seesion = 1 worker.loadbal1.balance_workers = tomcatA, tomcatB, tomcatC worker.stat1.type= status Note: if one of your servers is a slow server then lower the lbfactor of that server |
Apache mod_jk Directives | |||||||||||||||||||||
| Directive | Description | ||||||||||||||||||||
| JkWorkerFile | tells mod_jk where to find the workers property file | ||||||||||||||||||||
| JkLogFile | tells mod_jk where to write its logs | ||||||||||||||||||||
| JkLogLevel | sets the level of logging (info, error or debug) | ||||||||||||||||||||
| JkRequestLogFormat | specifies the log format, below are the options that you can use
| ||||||||||||||||||||
| JkMount | control the URL matching and forwarding to the Tomcat workers | ||||||||||||||||||||
Example | |||||||||||||||||||||
| JkWorkerFile | JkWorkerFile conf/worker.properties | ||||||||||||||||||||
| JkLogFile | JkLogFile /var/logs/httpd/mod_jk.log | ||||||||||||||||||||
| JkLogLevel | JkLogLevel debug | ||||||||||||||||||||
| JkRequestLogFormat | JkRequestLogFormat "%w %U %T" | ||||||||||||||||||||
| JkMount | JkMount /examples/jsp/* worker1 | ||||||||||||||||||||
SSL provides a secure connection between Tomcat and Apache, the steps involved in getting this working are
- Install OpenSSL on your server
- Check that Apache has mod_ssl support
- Get or generate a SSL certificate and install it into Apache
- Test the SSL-enabled Apache-Tomcat setup
| Check foe OpenSSL | # openssl version |
| Check for Apache modulemod_ssl | # |
There are a number of steps to generate a test certificate using OpenSSL
- Create the configuration file for generating the certificate
- Create a certificate signing request, this is what you send to the CA if you are buying a certificate
- Remove the passphrase from the private key
- Purchase a certificate from a CA or create a self-signed certificate
- Install the key and certificate to the Apache server
| step 1 | Create a working directory called certs # mkdir certs # cd certs Create a configuration file (myconfig.file) as below RANDFILE = ./random.txt [req] default_bits = 1024 default_keyfile = keyfile.pem attributes = req_attributes distinguished_name = Datadisk prompt = no output_password = secret [Datadisk] C = UK ST = Bucks L = Milton Keynes O = Datadisk OU = IT Consultant CN = 192.168.0.1 emailAddress = paul.valle@datadisk.co.uk [req_attributes] challengePassword = secret Create a random file called random.txt put a large number in it |
| step 2 | Now create the certificate # openssl req -new -out server.csr -config myconfig.file Two files should have been created server.csr and keyfile.pem |
| step 3 | Now remove the passphrase from the private key # openssl rsa -in keyfile.pem -out server.key |
| step 4 | Now create a self-signed certificate # openssl X509 -in server.csr -out server.crt -req -signkey server.key -days 365 Note: in a production environment the certificate signing request file generated (server.csr) is sent to a Certificate Authority and a certificated purchased |
| step 5 | Last but not least copy the server.key and server.crt in to the Apache conf directory |
| include the httpd-ssl.conf | include conf/extra/httpd-ssl.conf |
| Load the SSL modules | LoadModule ssl_module modules/mod_ssl.so |
| SSLCertificateKeyFile | set this attribute to the path to the server.key file |
| SSLCertificateFile | set this attribute to the path to the server.crt file |
The only change to make the Apache-Tomcat setup is to change the
.... JkWorkersFile ...... JkMount ........ |
I will be discussing Tomcat clustering in a later topic will describes a more detailed viewing of load balancing and persistent sessions with-in-memory session replication but for this section I will discuss a basic load balancing solution.
The mod_proxy module can also be used for load balancing but will not be discussed here, the mod_jk module sup[ports load balancing with seamless sessions, it uses a simple round-robin algorithm. Each Tomcat worker is weighted in the worker.properties file which specifies how the request load is distributed between workers.
A seamless session is also known as session affinity or a sticky session. When a request is made any of the Tomcat instances is used, but any subsequent request will be routed to the same Tomcat instance. to keep the same user session.
The following steps are required to set up load balancing in Tomcat
- Change the CATALINA_HOME in the Tomcat startup files to point to different locations for each of the Tomcat instances
- Set different AJP Connector ports for the instances
- Disable the Coyote HTTP/1.1 Connector
- set the jvmroute in the Standalone Engine
- Configure the Tomcat worker in the workers.properties file.
The first step is to change the CATALINA_HOME variable in each of the startup.bat (Windows) or startup.sh (Unix) instances
| CATALINA_HOME | set CATALINA_HOME=c:\apps\tomcatA Note: the other Tomcat instances would be tomcatB and tomcatC |
| AJP Connector port | Note: on the other Tomcat instances use ports 8010 and 8011 |
| server port | Note: on the other Tomcat instances use ports 8006 and 8007 |
| disable HTTP Connector |
| jvmRoute | Note: the other Tomcat instances would be tomcatB and tomcatC |
| Catalina Engine disable | Note: the other Tomcat instances would be tomcatB and tomcatC |
| httpd.conf directives | JkWorkersFile conf/worker.properties JkMount /examples/jsp/* bal1 JkMount /jkstatus/ stat1 |
| worker.properties file | worker.list = loadbal1,stat1 worker.tomcatA.type = ajp13 worker.tomcatA.host =192.168.0.1 worker.tomcatA.port = 8009 worker.tomcatA.lbfactor = 10 worker.tomcatB.type = ajp13 worker.tomcatB.host =192.168.0.1 worker.tomcatB.port = 8010 worker.tomcatB.lbfactor = 10 worker.tomcatC.type = ajp13 worker.tomcatC.host =192.168.0.1 worker.tomcatC.port = 8011 worker.tomcatC.lbfactor = 10 worker.loadbal1.type = lb worker.loadbal1.sticky_seesion = 1 worker.loadbal1.balance_workers = tomcatA, tomcatB, tomcatC worker.stat1.type= status |
| jsp test page | Index Page by tomcatAalign="centre" border="1">
|
| URL's | http://local/examples/jsp/index.jsp http://localhost/jkstatus |
No comments:
Post a Comment