Tuesday, September 28, 2010

S-T-D

What

STD is a Linux-based Security Tool. Actually, it is a collection of hundreds if not thousands of open source security tools. It's a Live Linux Distro, which means it runs from a bootable CD in memory without changing the native operating system of the host computer. Its sole purpose in life is to put as many security tools at your disposal with as slick an interface as it can.

Who

STD is meant to be used by both novice and professional security personnel but is not ideal for the Linux uninitiated. STD assumes you know the basics of Linux as most of your work will be done from the command line. If you are completely new to Linux, it's best you start with another live Distro like Knoppix to practice the basics (see faq).

STD is designed to assist network administrators and professionals alike secure their networks.

The STD community is extremely active. Come and join us on the forum here
The STD community is without exception White Hat. This means we will not entertain discussions on ANY illegal or unethical activities. Do Not ask.

Thank you :)

Monday, September 27, 2010

Configuring HTTPS for standalone tomcat

its really simple.

1> make a security key.

from command line go to java bin and type :
use the same password for both acquires occations
keytool -genkey -alias tomcat -keyalg RSA


2> change the server.xml at tomcat conf folder and change like follows


uncomment the SSL configurations and add few other options to  the Connector section:


               maxThreads="150" minSpareThreads="25" maxSpareThreads="75"
               enableLookups="false" disableUploadTimeout="true"
               acceptCount="100" scheme="https" secure="true"
               clientAuth="false" sslProtocol="TLS" 
  keystoreFile="${user.home}/.keystore" 
  keystorePass="adminabc123"/>


keystorePass="adminabc123" is the password you entered at the first step.

Friday, September 10, 2010

Password recover process for Unix like systems

This post will help you to change the root password of Unix flavors on RedHat, Fedora, etc...

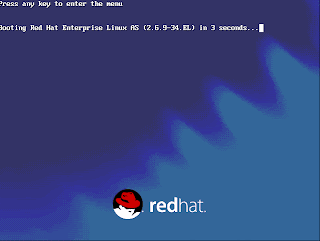
1.Let the system to boot.When the Boot Loader is starting.......

press 'e' to enter the menu edition dialog box. Then you will come to the following screen.

2.Confirm by pressing 'Enter key' to edit the boot configurations. You will see the advanced boot configuration menu with all available boot images.
3.Again press 'e', where you will end-up with following screen.
4. Here you can to set the Kernel Run Level: simply add :' 1' as done on the above figure. Then you Enter and you will come back to the Advanced boot menu. There you just press letter 'b' to start booting the system.

5.What we have done above is to change the boot-loader settings to change the boot configurations to make a minimum boot with single user mode run level.
So as expected you will end-up with LOVING #: root level access, and further its infinite access to the system.

6. Noe you can change the password easily:
 
type 'passwd' and yourpassword twice.

Now its back to usual x windows:

just restart the system using:
init 6
or reboot
or restart

Enjoy Linux with your new root password!!

Remember-> When you login next time its with username root


Enjoy!!! :-)

Tomcat and Apache Setup


Tomcat and Apache Setup
Most Tomcat configurations are a Apache/Tomcat setup, Apache serving up the static content and then passing any JSP to Tomcat to process. Tomcat can be integrated with Apache by using the JK Connector. The JK Connector uses the Apache JSserv Protocol (AJP) for communications between Tomcat and Apache.
The AJP Connector
The AJP protocol is used for communication between Tomcat and Apache, the software modules used on Apache are mod_jk or mod_proxy. Both are native code extension modules written in C/C++, on the Tomcat side the software module is the AJP Connector written in Java.
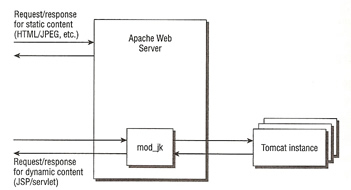
The below diagram shows how the native code Apache module (mod_jk or mod_proxy) works with Tomcat. Apache will receive the incoming JSP or servlet request and using the Apache module will pass this request via the AJP protocol to Tomcat, the response will also be sent back to the Apache server via the AJP protocol.

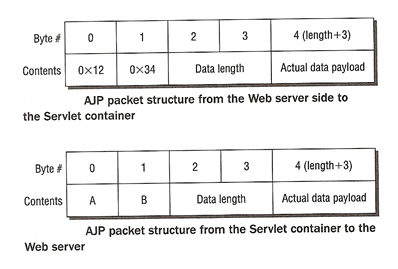
The Apache JServ Protocol (AJP) uses a binary format for transmitting data between the Web server and Tomcat, a network socket is used for all communication. The AJP packet consist of a packet header and a payload, below is the structure of the packet

As you can see, the binary packet starts with the sequence 0X1234, this is followed by the packet size (2 bytes) and then the actual payload. On the return path the packets are prefixed by AB (the ASCII codes for A and B), the size of the packet and then the payload.
The major feature of this protocol are

  • Good performance on fast networks
  • Support for SSL, encryption and client certificate
  • Support of clustering by forwarding requests to multiple Tomcat 6 servers
One of the ways the AJP protocol reduces latency is by making the Web server reuse already open TCP-level connections with Tomcat. This saves the overhead of opening a new socket connections for each request, its a bit like a connection pool.
The configuration of a AJP Connector is below

AJP Connector example
Tomcat Workers
A worker represents a running instance of Tomcat, a worker serves the requests for all dynamic web components. However you can run multiple instances of Tomcat in a cluster to implement load balancing or site partitioning. Each worker is identified by a unique hostname or a unique IP address and port number. You may what to implement multiple workers for the following reasons

  • When you want different Web application contexts to be served by different Tomcat workers
  • When you want different virtual hosts to be served by different Tomcat workers
  • When you want to service more requests than the capacity of a single physical server
To let Apache know where the Tomcat servers are a file called workers.properties is created detailing this information. I describe this file next

Worker List
AttributeDescription
work.list
Describe the workers that are available to Apache via a list
Worker Types
AttributeDescription
ajp13
This type of worker represents a running Tomcat instance
lb
used for load balancing
status
display useful information about how the load among the various Tomcat workers is distributed
jni
Used in process, this worker handles the forwarding of requests to in-process Tomcat workers using JNDI
ajp12
worker that support the AJP 1.2 protocol
Other Worker Properties
AttributeDescription
worker.test1.typeDescribes the type of worker (see above for types)
worker.test1.host
The host where the worker Tomcat instance resides
worker.test1.port
The port the AJP 1.3 Connector Tomcat instance is listening on (default 8009)
worker.test1.connection_pool_size
The number of connections used for this worker to be kept in a connection pool
worker.test1.connection_pool_minsize
The minimum number of connections kept in a connection pool
worker.test1.connection_pool_timeout
The number of seconds that connections to this worker should be left in the connection before expiry
worker.test1.mountThe contexts paths that are serviced by the worker, you can also use the JkMount directive in the http.conf file
worker.test1.retries
Controls the number of times mod_jk will retry when a worker returns a error
worker.test1.socket_timeout
controls how long a worker will wait for a response on a socket before indicating an error
worker.test1.socket_keepaliveindicates if the connection to the worker should be subject to keep alive
worker.test1.lbfactor
An integer indicating the local-balance factor used by the load balancer to distribute work between multiple instances of Tomcat.
Worker Loading Balancing Properties
AttributeDescription
worker.bal1.balance_workersA list of workers to load balance between
worker.bal1.lockThe type of locking used O (Optimistic) or P (Pessimistic)
worker.bal1.methodcan be set to R (Requests), T (Traffic), B (Busy-ness)
R = The worker to use is based on the number of requests forwarded
T = The worker to use is based on the traffic that had been sent to the workers
B = The worker to use is based on the load dividing the number of concurrent requests by the load factor
worker.bal1.secretSets a default secret password for all workers
worker.bal1.sticky_session
Tells the mod_jk to respect the sessionID in the request and ensures that the same session is always serviced by the same worker instance.
worker.bal1.sticky_session_forceThis is used for failover
Example
Simple exampleworker.list = worker1
worker.worker1.type = ajp13
worker.worker1.host = 192.168.0.1
worker.worker1.port = 9009
worker.worker1.connection_pool_size = 5
worker.worker1.connection_pool_timeout = 300
Load Balancing exampleworker.list = loadbal1,stat1

worker.tomcatA.type = ajp13
worker.tomcatA.host =192.168.0.1
worker.tomcatA.port = 8009
worker.tomcatA.lbfactor = 10

worker.tomcatB.type = ajp13
worker.tomcatB.host =192.168.0.2
worker.tomcatB.port = 8009
worker.tomcatB.lbfactor = 10

worker.tomcatC.type = ajp13
worker.tomcatC.host =192.168.0.3
worker.tomcatC.port = 8009
worker.tomcatC.lbfactor = 10

worker.loadbal1.type = lb
worker.loadbal1.sticky_seesion = 1
worker.loadbal1.balance_workers = tomcatA, tomcatB, tomcatC

worker.stat1.type= status
Note: if one of your servers is a slow server then lower the lbfactor of that server
There are a number of Apache directives that you can configure in the httpd.conf file

Apache mod_jk Directives
DirectiveDescription
JkWorkerFiletells mod_jk where to find the workers property file
JkLogFiletells mod_jk where to write its logs
JkLogLevelsets the level of logging (info, error or debug)
JkRequestLogFormatspecifies the log format, below are the options that you can use

%b or %Bbytes transmitted (not counting HTTP headers)
%Hrequest protocol
%mrequest method
%pport of the server for the request
%rfirst line of the request
%Trequest duration
%UURL of the request with query string removed
%v or %Vserver name
%wname of the tomcat worker
%Rthe route name of the session

JkMountcontrol the URL matching and forwarding to the Tomcat workers
Example
JkWorkerFileJkWorkerFile conf/worker.properties
JkLogFileJkLogFile /var/logs/httpd/mod_jk.log
JkLogLevelJkLogLevel debug
JkRequestLogFormatJkRequestLogFormat "%w %U %T"
JkMountJkMount /examples/jsp/* worker1
Configuring SSL for Apache
SSL provides a secure connection between Tomcat and Apache, the steps involved in getting this working are

  • Install OpenSSL on your server
  • Check that Apache has mod_ssl support
  • Get or generate a SSL certificate and install it into Apache
  • Test the SSL-enabled Apache-Tomcat setup
To make sure that you have openssl installed and the mod_ssl modules installed in Apache run the following

Check foe OpenSSL# openssl version
Check for Apache modulemod_ssl# /httpd -D DUMP_MODULES
If any of these are not installed then I recommend you download the latest version and install as per the Installation guides.
There are a number of steps to generate a test certificate using OpenSSL

  • Create the configuration file for generating the certificate
  • Create a certificate signing request, this is what you send to the CA if you are buying a certificate
  • Remove the passphrase from the private key
  • Purchase a certificate from a CA or create a self-signed certificate
  • Install the key and certificate to the Apache server
Below are the steps to creating your own cert

step 1Create a working directory called certs
# mkdir certs
# cd certs

Create a configuration file (myconfig.file) as below
RANDFILE = ./random.txt
[req]
default_bits = 1024
default_keyfile = keyfile.pem
attributes = req_attributes
distinguished_name = Datadisk
prompt = no
output_password = secret
[Datadisk]
C = UK
ST = Bucks
L = Milton Keynes
O = Datadisk
OU = IT Consultant
CN = 192.168.0.1
emailAddress = paul.valle@datadisk.co.uk
[req_attributes]
challengePassword = secret
Create a random file called random.txt put a large number in it
step 2Now create the certificate

# openssl req -new -out server.csr -config myconfig.file
Two files should have been created server.csr and keyfile.pem
step 3Now remove the passphrase from the private key

# openssl rsa -in keyfile.pem -out server.key
step 4Now create a self-signed certificate
# openssl X509 -in server.csr -out server.crt -req -signkey server.key -days 365
Note: in a production environment the certificate signing request file generated (server.csr) is sent to a Certificate Authority and a certificated purchased
step 5Last but not least copy the server.key and server.crt in to the Apache conf directory
To setup the mod_ssl in Apache you need to perform the following in Apache httpd.conf file

include the httpd-ssl.confinclude conf/extra/httpd-ssl.conf
Load the SSL modulesLoadModule ssl_module modules/mod_ssl.so
SSLCertificateKeyFileset this attribute to the path to the server.key file
SSLCertificateFileset this attribute to the path to the server.crt file
Once all the above is completed you can now point your browser to the Apache server, hopefully the browser will pop up with a security alert (because of the self-signed certificate).
The only change to make the Apache-Tomcat setup is to change the attribute


....
JkWorkersFile ......
JkMount ........
Load Balancing
I will be discussing Tomcat clustering in a later topic will describes a more detailed viewing of load balancing and persistent sessions with-in-memory session replication but for this section I will discuss a basic load balancing solution.
The mod_proxy module can also be used for load balancing but will not be discussed here, the mod_jk module sup[ports load balancing with seamless sessions, it uses a simple round-robin algorithm. Each Tomcat worker is weighted in the worker.properties file which specifies how the request load is distributed between workers.
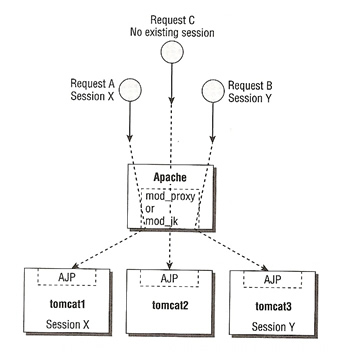
A seamless session is also known as session affinity or a sticky session. When a request is made any of the Tomcat instances is used, but any subsequent request will be routed to the same Tomcat instance. to keep the same user session.
The following steps are required to set up load balancing in Tomcat

  • Change the CATALINA_HOME in the Tomcat startup files to point to different locations for each of the Tomcat instances
  • Set different AJP Connector ports for the instances
  • Disable the Coyote HTTP/1.1 Connector
  • set the jvmroute in the Standalone Engine
  • Configure the Tomcat worker in the workers.properties file.
One assumption I will be making here is that all the Tomcat instances will be running on the same server
The first step is to change the CATALINA_HOME variable in each of the startup.bat (Windows) or startup.sh (Unix) instances

CATALINA_HOMEset CATALINA_HOME=c:\apps\tomcatA
Note: the other Tomcat instances would be tomcatB and tomcatC
Now in each Tomcat instance we must set a different AJP Connector port number (server.xml)

AJP Connector port8009" protocol="AJP/1.3" redirectPort="8443" />
Note: on the other Tomcat instances use ports 8010 and 8011
To avoid startup/shutdown port conflicts we must change each Tomcats worker server port (server.xml)

server port8005" shutdown="SHUTDOWN" debug="0">
Note: on the other Tomcat instances use ports 8006 and 8007
Because all the Tomcat instances will be running in conjunction with the load-balancer worker, it's possible that someone could directly access any of the available workers vioa the default HTTP Connector, by passing the load-balancer path. To avoid this comment out the HTTP Connector configuration of all the Tomcat instances (server.xml)

disable HTTP Connector
An important step for load balancing is specifying the jvmRoute. The jvmRoute is an attribute of Engine directive that acts as an identifier for that particular Tomcat worker. The attribute must be unique across all Tomcat instances, this unique ID is used in the workers.properties file for identifying each Tomcat worker (server.xml).

jvmRoutetomcatA" >
Note: the other Tomcat instances would be tomcatB and tomcatC
You will also need to comment out the Catalina Engine directive (server.xml)

Catalina Engine disable
Note: the other Tomcat instances would be tomcatB and tomcatC
In Apache's httpd.,conf file you need to add some load balancing directives, also make sure you have the module mod_jk loaded

httpd.conf directivesJkWorkersFile conf/worker.properties
JkMount /examples/jsp/* bal1
JkMount /jkstatus/ stat1
The last thing is to create the workers property file, i have already discuss this file above.

worker.properties fileworker.list = loadbal1,stat1

worker.tomcatA.type = ajp13
worker.tomcatA.host =192.168.0.1
worker.tomcatA.port = 8009
worker.tomcatA.lbfactor = 10

worker.tomcatB.type = ajp13
worker.tomcatB.host =192.168.0.1
worker.tomcatB.port = 8010
worker.tomcatB.lbfactor = 10

worker.tomcatC.type = ajp13
worker.tomcatC.host =192.168.0.1
worker.tomcatC.port = 8011
worker.tomcatC.lbfactor = 10

worker.loadbal1.type = lb
worker.loadbal1.sticky_seesion = 1
worker.loadbal1.balance_workers = tomcatA, tomcatB, tomcatC

worker.stat1.type= status
To test the load balancer and sticky sessions use the below JSP page (one for each instance), just place it in the webapps/examples/jsp directory.

jsp test page


Index Page by tomcatA


align="centre" border="1">


Session ID
Created on


Use the below URL's for testing, etc. Don't forget to play around with the lbfactor on each Tomcat instance to see what affect it has.

URL'shttp://local/examples/jsp/index.jsp
http://localhost/jkstatus

Tomcat 6 - Clustering


Tomcat Clustering
Clustering refers to running multiple instances of Tomcat that appear as one Tomcat instance. If one instance was to fail the other instances would take over thus the end user would not notice any failures.
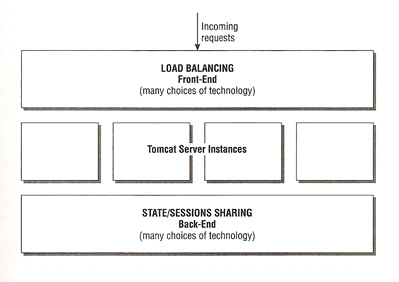
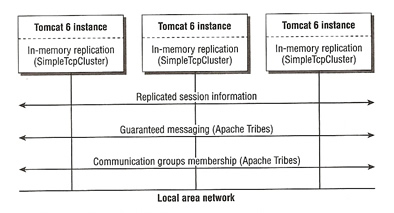
Clustering in Tomcat enables a set of Tomcat instances on a LAN to appear to the users a single server, as detailed in the below picture. This architecture allows more requests to handled and can handle if one server were to crash (High Availability) .

Incoming requests are distributed across all servers, thus the service can handle more users. This approach is known as horizontal scaling thus you can buy cheaper hardware and still use existing hardware without having to upgrade your existing hardware.
There are a number of different clustering models that are used Master-Backup, Fail-Over, Tomcat uses both of these and incorporates load balancing as well.
Tomcat Clustering Model
The Tomcat clustering model can be divided into two layers and various components

The two layers that enable clustering are the load-balancing frontend and the state-sharing/synchronization backend. The front-end deals with incoming requests and balancing them over a number of instances, while the backend is concerned with ensuring that shared session data is available to different instances.
There are a number of load-balancing frontends that you can use
  • Round-robin DNS, whereby a domain name resolution results in a set of IP addresses
  • A hardware-based load balancer
  • A software load-balancer like PLB (Pure Load Balancer)
  • Apache mod_proxy or mod_jk as a load balancer
Depending on your budget, most setups either use hardware-based load-balancer or Apache mod_proxy/mod_jk. I have already touched on how to configure a Apache mod_proxy and mod_jk in theApache Server selection. The area I did not cover was the use of Sticky Sessions or Session Affinity, what this means when set is that incoming requests with the same session are routed to the same Tomcat worker.

They only problem with sticky sessions is that if a Tomcat instance were to fail then all sessions are lost, but as with the load-balancing frontend, you have numerous session-sharing backends from which to choose. Each provides a different level of functionality as well as implementation complexity.
mod_proxy and mod_jk offer the following options
  • Sticky Sessions with no session sharing
  • Sticky Sessions with a Persistent Session Manager and a shared file store
  • Sticky Sessions with a Persistent Session Manager and a JDBC store to RDBMS
  • In-memory session replication
Sticky Session with no clustered session sharing ensures that that requests are handled by the same instance, the session ID is encoded with the route name of the server instance that created it, assisting in the routing of the request. This solution can be used by most Production system, it is simple and easy to maintain, there is no additional configuration or resource overhead but this solution has no HA capability, thus if a server were to crash all session data is lost with it.
Sticky Session with a persistence manager and a shared file store, which is already built into Tomcat. The idea is to stored session data thus in the event of a failure the session data can be retrieved. Using a shared disk device (NFS, SMB) all the Tomcat instances has access to the session data. However Tomcat will not guarantee when a sessions data will be persisted to the file store, thus you could have a case where a Tomcat instance crashes but the session data was not written to the file store. It only offers a slightly better solution to the one above.
Sticky session with a persistence session manager and a JDBC-based store, is the same as the file-based store, but uses a RDMBS instead
In-memory session replication, is session data replicated across all Tomcat instances within the cluster, Tomcat offers two solutions, replication across all instances within the cluster or replication to only its backup server, this solution offers a guaranteed session data replication, however this solution is more complex.

The Tomcat server instances running in the cluster are implemented as a communications group. At the Tomcat instance level, the cluster implementation is an instance of the SimpleTcpCluster class. Depending on your needs and the replication pattern, you can configure SimpleTcpCluster with one or two managers
  • DeltaManager - replicate sessions across all Tomcat instances
  • BackupManager - replicate sessions from a master to a backup instance
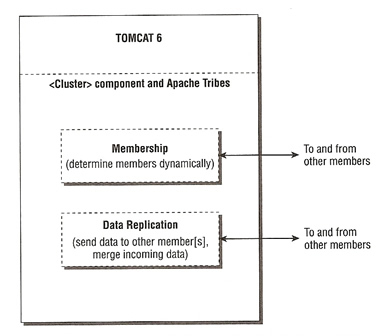
SimpleTcpCluster uses Apache Tribes to maintain communicate with the communications group. Group membership is established and maintained by Apache Tribes, it handles server crashes and recovery. Apache Tribes also offer several levels of guaranteed message delivery between group members. This is achieved updating in-session memory to reflect any session data changes, the replication is done immediately between members. This solution offers full HA but at a cost to heavy network loads, also additional hardware is often required to make sure there are no single points of failure in the network.
Session Management
Sessions are objects (which can contain and reference to other objects) that are kept on behalf of the a client. Because HTTP is stateless there is no simple way to maintain application state using the protocol alone. A server-side session is the main mechanism used to maintain state, it works as follows
  1. The server writes a cookie to the users browser instance, the cookie contains a token to retrieve the server-side session (data structure)
  2. The cookie is supplied by the browser instance every time it accesses a page on the site
  3. The server reads the token in the cookie to extract the corresponding session.
If a browser does not support cookies, it is possible to use URL rewrite to achieve a similar effect, the URL is decorated with the session ID being used.
Setting up Multiple Instances on one Machine
The cluster consists of three independent Tomcat instances and uses the following, the following is the setup used by all three Session-Sharing methods which i will go into detail later, but first the front-end
  • mod_jk load-balancing frontend
In the real world you would setup each instance on a separate server, but in this case each instance must have the following
  • Its own configuration directory
  • Its own temp directory
  • Its own webapps directory
  • Its own temporary work directory
  • TCP ports that are different from each other (AJP Connector)
  • Optionally other TCP or JDBC resources, depending on the backend session-sharing mechanism being deployed
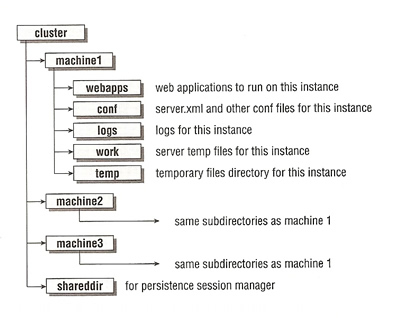
Three batch files called start1.bat, start2.bat and start3.bat are created and placed in the Tomcat bin directory. Each of the files set the CATALINA_HOME environment variable and then call the startup.bat file, so in each of the startup set the CATALINA_HOME variable to point to each instance
startup file# startup1.bat

set CATALINA_HOME=c:\cluster\machine1
call startup
shutdown file# stop1.bat

set CATALINA_HOME=c:\cluster\machine1
call shutdown
We will use the minimal configuration just to get the cluster up and running, so copy the directory structure below from a clean installation of Tomcat

First you must disable the HTTP connector, then change the AJP Connector and shutdown port for each of the instances
Instance NameFile to ModifyTCP Ports (Shutdown, AJP Connector)
machine 1\cluster\machine1\conf\server.xml8005, 8009
machine 2\cluster\machine2\conf\server.xml8105, 8109
machine 3\cluster\machine3\conf\server.xml8205, 8209
If you still have a problems starting the Tomcat instance due to port binding use the "netstat" command to find what is using the above port or to look for free ports.
Next you need to set a unique jvmRoute for each instance, i have already discussed jvmRoute
jvmRoutejvmRoute="machine1">
Note: the other instances will be machine2 and machine3
To indicate to a Servlet Container that the application can be clustered, a Servlet 2.4 standard element is placed into the applications deployment descriptor (web.xml). If this element is not added, the session maintained by this application across the three Tomcat instances will not be shared. You can also add it to the Context element
distributable
The front-end is setup in the Apache Server, i am not going to go into to much detail as i have already covered load-balancing
workers.properties fileworker.list = loadbal1,stat1

worker.machine1.type = ajp13
worker.machine1.host =192.168.0.1
worker.machine1.port = 8009
worker.machine1.lbfactor = 10

worker.machine2.type = ajp13
worker.machine2.host =192.168.0.2
worker.machine2.port = 8109
worker.machine2.lbfactor = 10

worker.machine3.type = ajp13
worker.machine3.host =192.168.0.3
worker.machine3.port = 8209
worker.machine3.lbfactor = 10

worker.bal1.type = lb
worker.bal1.sticky_session = 1
worker.bal1.balance_workers = machine1, machine2, machine3

worker.stat1.type= status
httpd.conf updatesJkMount /examples/jsp/* bal1
JkMount /jkstatus/ stat1

JkWorkersFile conf/workers.properties
JSP page# Create file sestest.jsp


Session serviced by machine1


Session ID


Created on


Note: create for each instance and change the machine name above
Session-Sharing Backend
The above is the same setup for all three Session-Sharing backends, which I am now going to show you how to set these up.
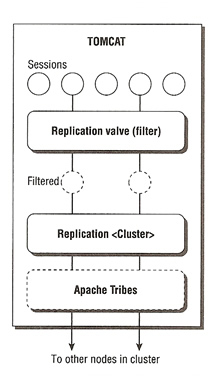
The first i am going to setup is the In-Memory replication, two components needs to be configured to enable in-memory configuration, the element is responsible for the actual session replication, this includes the sending of new session information to the group, incorporating new incoming session information locally and management of group membership (it uses Apache Tribes). The other component is a replication Valve which is used to reduce the potential session replication traffic by ruling out (filtering) certain requests from session replication.

The only implementation of in-memory replication is called SimpleTcpCluster, it uses Apache Tribes for communication which uses regular multicasts (heartbeat packets) to determine membership. All node that are running must multicasts a heartbeat at regular frequency, if they do not send a heartbeat the node is considered dead and is removed from the cluster. The membership of the cluster is managed dynamically as nodes are added or removed. Session data is replicated between the all nodes in the cluster via TCP by using end-to-end communication.

Because of the amount of network traffic generated, you should only use a small number of nodes within the cluster, unless you have vast amounts of memory and can supply a high bandwidth network. You can reduce the amount of data by using the BackupManager (send only to one node, the backup node) instead of DeltaManager (sends to all nodes within the cluster).
ElementDescription
The cluster element is nested inside an enclosing element, it essentially enables session replication for all applications in the host.
This is a mandatory component, this is where you configure either DeltaManager or BackupManager, they both send replication information to others via Channels from the Apache Tribes group communications library.
A channel is an abstract endpoint, (like a socket) that a member of the group can send and receive replicated information through. Channels are managed and implemented by the Apache Tribes communications framework. Channel has only one attribute.
This attribute selects the physical network interface to use on the server (if you have only one network adapter you generally don't need this). This service is based on sending a multicasts heartbeat regularly, which determines and maintains information on the servers that are considered part of the group (cluster) at any point in time.
This element configures the TCP receiver component of the Apache Tribes Framework, it receives the replicated data information from other members.

This element configures the TCP sender component of the Apache Tribes Framework, it sends the replicated data information to other members.
This element performs the real stuff, tribes support having a pool of senders, so that messages can be sent in parallel and if using NIO sender, you can send messages concurrently as well.
Interceptor components are nested components of and are message processing components that can chained together to alter the behavior or add value to the option of a channel. basically you have a option flag that will trigger its operation.
This element acts as a filter for In-Memory replication, it reduces the actual session replication network traffic by determining if the current session needs to be replicated at the end of the request cycle. Even through this element is inside the element it is consider to be inside the element.
Some of the work of the cluster is performed by hooking up listeners to replication messages that are passing through it.
You must configure org.apache.catalina.ha.session.JvmRouteSessionIDBinderListener if you are using JvmRouteBinderValve to ensure session stickiness transfers with a fail-over

You must also configure org.apache.catalina.ha.session.ClusterSessionListener if using DeltaManager because this listener forwards the messages to the manager for delta and merging operations.
Now to go into details on what options each element can have
Element
Attribute Name
Description
default
className
The implementation Java Class for the cluster manager current uses org.apache.catalina.ha.tcp.SimpleTcpCluster
channelSendOptionsOption flags are included with messages sent and can be used to trigger Apache Tribes channel interceptors. The numerical value is a logical OR flag values including

Channel.SEND_OPTIONS_ASYNCHRONRONUS 8
Channel.SEND_OPTIONS_BYTE_MESSAGE 1
Channel.SEND_OPTIONS_SECURE 16
Channel.SEND_OPTIONS_SYNCHRONIZED_ACK 4
Channel.SEND_OPTIONS_USE_ACK 2
11 (async with ack)
Element (mandatory)
Attribute Name
Description
default
classNameorg.apache.catalina.ha.session.DeltaManager
org.apache.catalina.ha.session.BackupManager
nameA name for the cluster manager, this name should be the same on all instances
notifyListeners-OnReplicationIndicates if any session listeners should be notified when sessions are replicated between instances
false
expireSessions-OnShutdownSpecifies whether it is necessary to expire of all sessions upon application shutdown
false
domainReplicationSpecifies whether replication should be limited to domain members only, this option is only available for DeltaManager
false
mapSendOptionsWhen using the BackupManager, this maps the send options that are set to trigger interceptors
8 (async)
Element
Attribute Name
Description
default
classNameorg.apache.catalina.tribes.group.GroupChannel
Element
Attribute Name
Description
default
classNameorg.apache.catalina.tribes.membership.McastService
addressThe multicast address selected for this instance
228.0.0.4
portThe multicast port used
45564
frequency (milliseconds)Frequency which heartbeat multicasts are sent (in milliseconds)
500
dropTime (milliseconds)The time elapsed without heartbeats before the service considers a member has died and removes it from the group (in milliseconds)
3000
ttlSets the time-to-live for multicast messages sent (may be used if network traffic are going through any routers)
soTimeoutThe SO_TIMEOUT value on the socket that multicasts messages are sent to. Controls the maximum time to wait for a send/receive to complete
0
domainFor partitioning group members into separate domains for replication.
bindThe IP address of the adaptor that the service should bind to.
0.0.0.0
Element
Attribute Name
Description
default
classNameorg.apache.catalina.tribes.transport.nio.NioReceiver
addressThe IP address to bind to, to receive incoming TCP data (you must sent this for multi-homed hosts)
auto
portSelects the port to use for imcoming TCP data.
4000
autoBindTells the framework to hunt for an available port, starting for the specified port number and add up to this number
1000
selectorTimeout (millseconds)Bypass for old NIO bug. sets the milliseconds timeout while polling for incoming messages
5000
maxThreadsThe maximum number of threads to create to receive incoming messages
6
minThreadsThe minimum number of threads to create to receive incoming messages
6
Element (must contain a Transmitter element)
Attribute Name
Description
default
classNameorg.apache.catalina.tribes.transport.ReplicationTransmitter
Element
Attribute Name
Description
default
classNameorg.apache.catalina.tribes.transport.nio.PooledParallelSender
org.apache.catalina.tribes.transport.bio.PooledMultiSender
maxRetryAttemptsThe number of retries the framework conducts when encountering socket-level errors during sending of a message
1
timeoutThe SO_TIMEOUT value on the socket that messages are sent on. Controls the maximum time to wait for a send to complete
3000
poolsizeControls the maximum number of TCP connections opened by the sender between the current and another member in the group. only available when using org.apache.catalina.tribes.transport.nio.PooledParallelSender
25
Element
Attribute Name
Description
org.apache.catalina.tribes.group.interceptors
.TcpFailureDetector
When membership pings do not arrive the interceptor attempts to connect to the problematic member to validate that the member is no longer reachable before the membership list is adjusted
org.apache.catalina.tribes.group.interceptors
.MessageDispatch5Interceptor
The asynchronous message dispatcher, triggered by default send option value 8 (its hard coded)
org.apache.catalina.tribes.group.interceptors
.ThroughputInterceptor
Logs cluster messages throughput information to Tomcat logs
Replication Element
Attribute Name
Description
classNameorg.apache.catalina.ha.tcp.ReplicationValve
filterA semicolon-delimited list of URL pattern for requests that are to be filtered out.
Example
server.xml file


port="4200"
autoBind="100"
selectorTimeout="5000"
maxThreads="6" />


Note: the port in bold is the one you need to change for each instance
Testing In-Memory Session Replication Cluster
You need to perform the following to test the In-Memory session replication
  1. Ensure that the , are uncommented in all three instances, also make sure that the element is commented out.
  2. Start all three instances
  3. Start the Apache server with the mod_jk module
  4. Open a browser to http:///examples/jsp/sesstest.jsp
  5. Check that its working correctly, then shutdown the instance that had your session
  6. Retest using the browser and hopefully it should pickup the other instance but have the same session ID
I have a catalina log file with cluster logging information, starting up, a node going down and rejoining, this log file is from the example I have given above, although I used different IP address but i am sure you get the idea.
Persistent Session Manager with a shared file store
To setup a persistent session manager you must comment out the element in each instance, this disables the In-Memory replication mechanism, then add a context.xml file to each instance with the below
context.xml


  1. Restart the tomcat instances
  2. Open a browser to http:///examples/jsp/sesstest.jsp
  3. Click a number of times, you should stay with the same instance (sticky session working)
  4. Shutdown an instance
  5. Retest using the browser and hopefully it should pickup the other instance but have the same session ID
Persistent Session Manager with a JDBC store
The only difference between a file-based store and a JDBC-based store is the element
context.xml
Create a table in your databasecreate table tomcat_sessions (
session_id varchar(100) not null primay key,
valid_session char(1) not null,
max_inactive int not null,
last_access bigint not null,
app_context varchar(255),
session_data meduimlob,
KEY kapp_context(app_context)
);
  1. Restart the tomcat instances
  2. Open a browser to http:///examples/jsp/sesstest.jsp
  3. Click a number of times, you should stay with the same instance (sticky session working)
  4. Shutdown an instance
  5. Retest using the browser and hopefully it should pickup the other instance but have the same session ID