Monday, December 20, 2010

Forwarding apache requests to Tomcat servlet container

Most web applications todays are using favorite Apache web server for its proven architecture and free apache license.
Tomcat is same as a very famous servlet container or java application server.
 Although tomcat itself can be access as a simple web server, for production environments it may lack some features like load-balancing, redundancy, etc.

So the best way to use is to integrate those two application, and finally its a great combination for enterprise applications for excess performance and ease of maintenance.

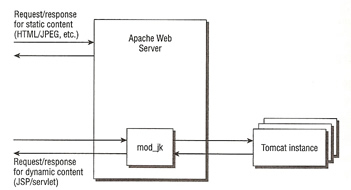
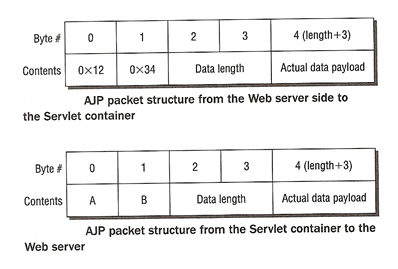
The theory behind is to use a middle tier connector called mod_jk.so module which communicate using AJP(Apache JSer Protocol ) version 1.3, best of currently available stable version.See the following figure for graphical view.


Here in this small steps guide i configure an Apache2 to a single instance of Tomcat6.Any comments and improvements are welcome at the end.

installations:


install apache2;Web server who listen on port 80
sudo apt-get install apache2


install tomcat6 and its applications>Application server/Web Container who translate application code in to results listen on port 8080 by default

sudo apt-get install tomcat6
sudo apt-get install tomcat6-common
sudo apt-get install tomcat6-examples
sudo apt-get install tomcat6-admin
sudo apt-get install tomcat6-docs
sudo apt-get install tomcat6-user

install libapache2-mod-jk>Connector module to forward web request to redirect in to tomcat's port 8009,8005 etc
sudo apt-get install libapache2-mod-jk

Configurations:

ask Apache to forward default pages to ajp13_worker through installed jk module by adding following two lines to this file by 'gedit /etc/apache2/sites-enabled/000-default'
<.....>
ServerAdmin chand@engineering.com  
JkMount / ajp13_worker JkMount /* ajp13_worker


....... file continues................

to make above to work, verify that following line is there on '/etc/apache2/mods-enabled/jk.load' 
LoadModule jk_module /usr/lib/apache2/modules/mod_jk.so

Now you have to tell jk_mod to find its configuration file path and how it should log errors and other informations.So add the following lines after LoadModule as above


JkWorkersFile /etc/libapache2-mod-jk/workers.properties 
JkLogFile /var/log/apache2/mod_jk.log 
JkShmFile /var/log/apache2/mod_jk.shm
JkLogLevel info
JkLogStampFormat "[%a %b %d %H:%M:%S %Y] "


Now Apache will forward the requests to mod_jk module.Now its time to configure mod_jk to forward those request to Tomcat.So goto its configuration file as you defined on the above:

/etc/libapache2-mod-jk/workers.properties 


Here you have to explicitly and correctly define 3 main parameters for jk module:

  • Tomcat Home
  • Java Home
  • Exact parameters of the Worker(ex: ajp13_worker )

in my server its with following configurations.But you can goto relevant folders and find out what are the available folders/java VMs you can configure for.

workers.tomcat_home=/usr/share/tomcat6


workers.java_home=/usr/lib/jvm/java-6-openjdk

worker.list=ajp13_worker

worker.ajp13_worker.port=8009
worker.ajp13_worker.host=localhost
worker.ajp13_worker.type=ajp13
worker.loadbalancer.balance_workers=ajp13_worker


OK! now jk module knows how to forward requests to port 8009, then we have to configure someone to listen on port 8009, and its tomcat.

Goto /etc/tomcat6/server.xml
By default tomcat don't listen to ajp13 protocol on port 8009, only on 8080 fot http requests.
you can uncomment the following line


'< Connector port="8009" protocol="AJP/1.3" redirectPort="8443" /  >'


Now to all those changes to take effect you have to restart both services, but tomcat6 1st and then apache.

When you browse to http://localhost  you must be shown with tomcat's default page as you seen by http://localhost:8080

if both are same... now all your web requests on port 80 that were listen by apache web server are forwarding to Tomcat Servlet container.

In the same way as above, you can configure apache to request PHP sites as well.Lets see it in some other article.

Good Luck!!!!

Sunday, December 19, 2010

Enable Packet forwarding on for Internet Connection Sharing on Linux

Enable NATting for internet connection:


ppp0-internet connected port


add on startup or to /etc/init.d/rc.local


sudo iptables -t nat -A POSTROUTING -o ppp0 -j MASQUERADE


Enable Packet accep for incoming requests:


Edit following file and change/uncomment following line to enable packet forwarding for incoming request packets.


/etc/sysctl.conf: net.ipv4.ip_forward = 1


to get control over the packet forwarding, we can forward all NATed packets to a local proxy server

to disable direct packet forwarding, change
/etc/sysctl.conf: net.ipv4.ip_forward = 0

then add an additional route;
i don't know whether the sequence of following will affect, just check you guys ans let me know....
:-)

iptables -t nat -A PREROUTING -i eth1 -p tcp --dport 80 -j REDIRECT --to-port 3128

iptables -t nat -A POSTROUTING -o ppp0 -j MASQUERADE

Saturday, December 4, 2010

Approach to Multi Threaded Socket Communication


On this article i will introduce with socket connection on single server multiple clients,Single client multiple messages(transaction based continuous connection),Multiple client multiple transaction (per connection). I will proceed with two methods of threading (extend Thread and implement Runnable).
Also at the requirement, i'll explain the use of synchronized shared objects and serialized data objects.
This article is the extend of basic-socket-programming article on www.chandpriyankara.tk/www.estudents.lk
single server multiple clients
This scenario is the most widely used socket communication in general.For example web servers.Many clients connects to the server requesting some data.The 3way TCP/IP handshake will initiate and identifies the two parties.Here, as regular, client who needs data wants to start the connection.Server or the data source must be up and running, waiting for a connection request form a client for a particular local port number(eg:80).Client will connect to the server,and the server will start a new thread in order to serve the clients request and transfer context to that thread.The master/main thread will resume and will stand by for another request from some other client(may be the same client).The created thread will process independently and serve data to the client.
As soon as the data is served, the connection will be closed.So, same client for some other data, wants to initiate another connection.This way the server is stateless of the clients, or all requests/connections are totally independent with others.
To serve independantly, the server must have a multi-thread application while client may very.

Thursday, December 2, 2010

Basic Socket Programming


Socket programming a is data exchange method used in electrical systems, specially within two or more(even itself) systems within a network reachability.

Inter networked computers are widely using this method to transfer various data and information with remote systems.Socket programming, just up on the TCP layer, provides a mean of interprocess communication. In order to successful completion of the socket communication, all TCP/IP and lower layers need to be fully and correctly in functional.

As this articel involved in explaining simple simple data transfer implementation we will limit the limit our scope into computer application programming with its simplest form.

In order to exchange data within systems, there need to be at least two parties, who Requires some data to transfer to a Listener party. Who request to send data, or the one who initiate to connect is called the client. Who is ready to listen, and waiting for some one else to initiate a request is called server.

In order to start the communication, the server need to be ready and on listening state. So, at a glance lets look how to make a server and make it to listen for a client request.

Most of the languages provides easy way to create this object, while here i go with java.

A socket connection consists of a application layer's port and internet/IP layer's IP address.IP address belongs to the OS. So our application have no control over it.But we can use any[1-65535 (below 1024 need root access)] port[to listen].

According to the requirements we can use several implementation techniques to handle data transfered between a socket connection.It may be uni-directional, client server, multi thread server, transaction based,etc.

We may first go through basic implementation of a TCP listener or a listener socket.

For this article i use JDK 1.6 with NetBeans 6.9 on Ubunut 10.10 but codings are same for any java implementation (for same JDK).

File->New Project->Java(Categories)||Java Application(Application)->Project Name||Create Main Class->Finish

import Server Socket object.
import java.net.ServerSocket;

try {  
ServerSocket serverSocket = new ServerSocket(2000, 1);            
Socket clientSocket = serverSocket.accept();

//this part of the code will handle the business logic

        } catch (IOException ex){
            Logger.getLogger(Main.class.getName()).log(Level.SEVERE, null, ex);
        }

Server socket will reserve a port number for the application process, which waits for a connection request from another process[local/remote].

'serverSocket.accept()'  will return a reference ('clientSocket') to the local end socket for the newly established data pipe.It can be used when ever the process wants to send or receive data back and forth.Initially the server process will run up to above line and hang there until a remote client send a request to connect.

Prepare another java project as above and implement a  client socket:

Socket socket = new Socket("localhost", 2000);
//business logic comes here
} catch (UnknownHostException unknownHostException) {
            System.out.println("Host no Found: " + unknownHostException.toString());
        } catch (IOException iOExceptionx) {
            System.out.println("Connection Failed: " + iOExceptionx.toString());
       } 
   }


Now, the connection can be established.But there is no use till we use it to send and receive data through the connection.So, create read and write iostreams on both socket ends.

on Server side:
InputStream receiveData = clientSocket.getInputStream();            
OutputStream sendData = clientSocket.getOutputStream();

on Client side:
InputStream receiveData = socket.getInputStream();            
OutputStream sendData = socket.getOutputStream();

Now  we can send and receive data through data channel between two processes.

Complete Code for Server:
package javaapplication1;
import java.io.IOException;
import java.io.InputStream;
import java.io.OutputStream;
import java.net.ServerSocket;
import java.net.Socket;
/** 
* @author chand 
*/
public class Main {
/**
public static void main(String[] args) {
        try {
            // TODO code application logic here
            int maxDataSize = 100;
            String messageToSend = "messageFromServer";
            String receivedMessageFromClient = "";
            ServerSocket serverSocket = new ServerSocket(2000, 1);
            Socket clientSocket = serverSocket.accept();
            InputStream receiveData = clientSocket.getInputStream();
            OutputStream sendData = clientSocket.getOutputStream();

byte[] data = new byte[maxDataSize];
                      int receivedMessageLength = receiveData.read(data);
           receivedMessageFromClient = new String(data);
            System.out.println("\nReceivedMessageFromClient: " + receivedMessageFromClient                    + " messageLength: " + receivedMessageLength);

data = messageToSend.getBytes();
            sendData.write(data);

} catch (IOException iOExceptionx) {
           System.out.println("Connection Failed: " + iOExceptionx.toString());        }    
}
}

Complete Code for Client:

kage javaapplication2;
import java.io.IOException;
import java.io.InputStream;
import java.io.OutputStream;
import java.net.Socket;
import java.net.UnknownHostException;
/**
*
* @author chand
*/
public class Main {
/**
* @param args the command line arguments
*/
public static void main(String[] args) {
try {
// TODO code application logic here
int maxDataSize = 100;
String messageToSend = "messageFromClient";
String receivedMessageFromServer = "";
Socket socket = new Socket("localhost", 2000);
InputStream receiveData = socket.getInputStream();
OutputStream sendData = socket.getOutputStream();
byte[] data = new byte[maxDataSize];
//write and read events has been interchanged to avoid dead locks
data = messageToSend.getBytes();
sendData.write(data);
int receivedMessageLength = receiveData.read(data);
receivedMessageFromServer = new String(data);
System.out.println("\nReceivedMessageFromServer: " + receivedMessageFromServer
+ " messageLength: " + receivedMessageLength);
} catch (UnknownHostException unknownHostException) {
System.out.println("Host no Found: " + unknownHostException.toString());
} catch (IOException iOExceptionx) {
System.out.println("Connection Failed: " + iOExceptionx.toString());
}
}

Tuesday, November 2, 2010

Steps for creating blazds communication

Steps for creating blazds communication
1.web.xml need to hava servlet mapping for servlet engine
  [  
        flex.messaging.HttpFlexSession


        MessageBrokerServlet
        MessageBrokerServlet
        flex.messaging.MessageBrokerServlet
        
            services.configuration.file            /WEB-INF/flex/services-config.xml      
        1


RDSDispatchServlet
RDSDispatchServlet
flex.rds.server.servlet.FrontEndServlet

useAppserverSecurity false
10


RDSDispatchServlet
/CFIDE/main/ide.cfm


        MessageBrokerServlet
        /messagebroker/*
  
]

2.services-config.xml need to have initalized with services + defauld channel + other regular values
[


server="Tomcat" />


class="mx.messaging.channels.AMFChannel">

url="http://{server.name}:{server.port}/{context.root}/messagebroker/amf"
class="flex.messaging.endpoints.AMFEndpoint" />


class="mx.messaging.channels.SecureAMFChannel">

url="https://{server.name}:{server.port}/{context.root}/messagebroker/amfsecure"
class="flex.messaging.endpoints.SecureAMFEndpoint" />

false


class="mx.messaging.channels.AMFChannel">

url="http://{server.name}:{server.port}/{context.root}/messagebroker/amfpolling"
class="flex.messaging.endpoints.AMFEndpoint" />

false
4


class="mx.messaging.channels.HTTPChannel">

url="http://{server.name}:{server.port}/{context.root}/messagebroker/http"
class="flex.messaging.endpoints.HTTPEndpoint" />


class="mx.messaging.channels.SecureHTTPChannel">

url="https://{server.name}:{server.port}/{context.root}/messagebroker/httpsecure"
class="flex.messaging.endpoints.SecureHTTPEndpoint" />

false


[BlazeDS]
true
true
true
true


Endpoint.*
Service.*
Configuration


true
20
{context.root}/WEB-INF/flex/services-config.xml

{context.root}/WEB-INF/flex/proxy-config.xml

{context.root}/WEB-INF/flex/remoting-config.xml

{context.root}/WEB-INF/flex/messaging-config.xml

{context.root}/WEB-INF/flex/data-management-config.xml

{context.root}/WEB-INF/web.xml


]

3.remoting-config.xml need to have defined adaptors + distinations +
[


class="flex.messaging.services.remoting.adapters.JavaAdapter"
default="true" />

class="flex.messaging.services.messaging.adapters.ActionScriptAdapter" />

class="flex.messaging.services.messaging.adapters.JMSAdapter" />


hello.Hello


]

4.Define the remote object at the action script/application .mxml file


5. Define result handler and fault handler methods

[ private function faultHandler(fault:FaultEvent):void {
result_text.text = "code:\n" + fault.fault.faultCode + "\n\nMessage:\n" + fault.fault.faultString + "\n\nDetail:\n" + fault.fault.faultDetail;
}

private function resultHandler(evt:ResultEvent):void {
var hh:valueObjects.RemoteObject = (valueObjects.RemoteObject)(evt.message.body);
//result_text.text = evt.message.body.toString();
result_text.text = hh.address;
result_text.text += "\n" + hh.id;
result_text.text += "\n" +hh.name;
}
]

6.Invoke functions from a user custom event object


package hello;

public class Hello {
RemoteObject rm ;
    public RemoteObject sayHello() {
        return this.rm;
    }
  
    public void saveHello(RemoteObject rmOb) {
        this.rm = rmOb;
    }
    public Hello() {
rm = new RemoteObject();
rm.setId(56);
rm.setAddress("79-A");
rm.setName("chand");
}
}


package hello;

import java.io.Serializable;

public class RemoteObject implements Serializable {

private static final long serialVersionUID = 4355646632118270964L;
private int id = 0;
private String name = "";
private String address = "";

public int getId() {
return id;
}

public void setId(int id) {
this.id = id;
}

public String getName() {
return name;
}

public void setName(String name) {
this.name = name;
}

public String getAddress() {
return address;
}

public void setAddress(String address) {
this.address = address;
}
}

Tuesday, September 28, 2010

S-T-D

What

STD is a Linux-based Security Tool. Actually, it is a collection of hundreds if not thousands of open source security tools. It's a Live Linux Distro, which means it runs from a bootable CD in memory without changing the native operating system of the host computer. Its sole purpose in life is to put as many security tools at your disposal with as slick an interface as it can.

Who

STD is meant to be used by both novice and professional security personnel but is not ideal for the Linux uninitiated. STD assumes you know the basics of Linux as most of your work will be done from the command line. If you are completely new to Linux, it's best you start with another live Distro like Knoppix to practice the basics (see faq).

STD is designed to assist network administrators and professionals alike secure their networks.

The STD community is extremely active. Come and join us on the forum here

The STD community is without exception White Hat. This means we will not entertain discussions on ANY illegal or unethical activities. Do Not ask.

Thank you :)

Monday, September 27, 2010

Configuring HTTPS for standalone tomcat

its really simple.

1> make a security key.

from command line go to java bin and type :
use the same password for both acquires occations
keytool -genkey -alias tomcat -keyalg RSA


2> change the server.xml at tomcat conf folder and change like follows


uncomment the SSL configurations and add few other options to  the Connector section:


               maxThreads="150" minSpareThreads="25" maxSpareThreads="75"
               enableLookups="false" disableUploadTimeout="true"
               acceptCount="100" scheme="https" secure="true"
               clientAuth="false" sslProtocol="TLS" 
  keystoreFile="${user.home}/.keystore" 
  keystorePass="adminabc123"/>


keystorePass="adminabc123" is the password you entered at the first step.

Friday, September 10, 2010

Password recover process for Unix like systems

This post will help you to change the root password of Unix flavors on RedHat, Fedora, etc...

1.Let the system to boot.When the Boot Loader is starting.......

press 'e' to enter the menu edition dialog box. Then you will come to the following screen.

2.Confirm by pressing 'Enter key' to edit the boot configurations. You will see the advanced boot configuration menu with all available boot images.
3.Again press 'e', where you will end-up with following screen.
4. Here you can to set the Kernel Run Level: simply add :' 1' as done on the above figure. Then you Enter and you will come back to the Advanced boot menu. There you just press letter 'b' to start booting the system.

5.What we have done above is to change the boot-loader settings to change the boot configurations to make a minimum boot with single user mode run level.
So as expected you will end-up with LOVING #: root level access, and further its infinite access to the system.

6. Noe you can change the password easily:
 
type 'passwd' and yourpassword twice.

Now its back to usual x windows:

just restart the system using:
init 6
or reboot
or restart

Enjoy Linux with your new root password!!

Remember-> When you login next time its with username root


Enjoy!!! :-)

Tomcat and Apache Setup


Tomcat and Apache Setup
Most Tomcat configurations are a Apache/Tomcat setup, Apache serving up the static content and then passing any JSP to Tomcat to process. Tomcat can be integrated with Apache by using the JK Connector. The JK Connector uses the Apache JSserv Protocol (AJP) for communications between Tomcat and Apache.
The AJP Connector
The AJP protocol is used for communication between Tomcat and Apache, the software modules used on Apache are mod_jk or mod_proxy. Both are native code extension modules written in C/C++, on the Tomcat side the software module is the AJP Connector written in Java.
The below diagram shows how the native code Apache module (mod_jk or mod_proxy) works with Tomcat. Apache will receive the incoming JSP or servlet request and using the Apache module will pass this request via the AJP protocol to Tomcat, the response will also be sent back to the Apache server via the AJP protocol.

The Apache JServ Protocol (AJP) uses a binary format for transmitting data between the Web server and Tomcat, a network socket is used for all communication. The AJP packet consist of a packet header and a payload, below is the structure of the packet

As you can see, the binary packet starts with the sequence 0X1234, this is followed by the packet size (2 bytes) and then the actual payload. On the return path the packets are prefixed by AB (the ASCII codes for A and B), the size of the packet and then the payload.
The major feature of this protocol are

  • Good performance on fast networks
  • Support for SSL, encryption and client certificate
  • Support of clustering by forwarding requests to multiple Tomcat 6 servers
One of the ways the AJP protocol reduces latency is by making the Web server reuse already open TCP-level connections with Tomcat. This saves the overhead of opening a new socket connections for each request, its a bit like a connection pool.
The configuration of a AJP Connector is below

AJP Connector example
Tomcat Workers
A worker represents a running instance of Tomcat, a worker serves the requests for all dynamic web components. However you can run multiple instances of Tomcat in a cluster to implement load balancing or site partitioning. Each worker is identified by a unique hostname or a unique IP address and port number. You may what to implement multiple workers for the following reasons

  • When you want different Web application contexts to be served by different Tomcat workers
  • When you want different virtual hosts to be served by different Tomcat workers
  • When you want to service more requests than the capacity of a single physical server
To let Apache know where the Tomcat servers are a file called workers.properties is created detailing this information. I describe this file next

Worker List
AttributeDescription
work.list
Describe the workers that are available to Apache via a list
Worker Types
AttributeDescription
ajp13
This type of worker represents a running Tomcat instance
lb
used for load balancing
status
display useful information about how the load among the various Tomcat workers is distributed
jni
Used in process, this worker handles the forwarding of requests to in-process Tomcat workers using JNDI
ajp12
worker that support the AJP 1.2 protocol
Other Worker Properties
AttributeDescription
worker.test1.typeDescribes the type of worker (see above for types)
worker.test1.host
The host where the worker Tomcat instance resides
worker.test1.port
The port the AJP 1.3 Connector Tomcat instance is listening on (default 8009)
worker.test1.connection_pool_size
The number of connections used for this worker to be kept in a connection pool
worker.test1.connection_pool_minsize
The minimum number of connections kept in a connection pool
worker.test1.connection_pool_timeout
The number of seconds that connections to this worker should be left in the connection before expiry
worker.test1.mountThe contexts paths that are serviced by the worker, you can also use the JkMount directive in the http.conf file
worker.test1.retries
Controls the number of times mod_jk will retry when a worker returns a error
worker.test1.socket_timeout
controls how long a worker will wait for a response on a socket before indicating an error
worker.test1.socket_keepaliveindicates if the connection to the worker should be subject to keep alive
worker.test1.lbfactor
An integer indicating the local-balance factor used by the load balancer to distribute work between multiple instances of Tomcat.
Worker Loading Balancing Properties
AttributeDescription
worker.bal1.balance_workersA list of workers to load balance between
worker.bal1.lockThe type of locking used O (Optimistic) or P (Pessimistic)
worker.bal1.methodcan be set to R (Requests), T (Traffic), B (Busy-ness)
R = The worker to use is based on the number of requests forwarded
T = The worker to use is based on the traffic that had been sent to the workers
B = The worker to use is based on the load dividing the number of concurrent requests by the load factor
worker.bal1.secretSets a default secret password for all workers
worker.bal1.sticky_session
Tells the mod_jk to respect the sessionID in the request and ensures that the same session is always serviced by the same worker instance.
worker.bal1.sticky_session_forceThis is used for failover
Example
Simple exampleworker.list = worker1
worker.worker1.type = ajp13
worker.worker1.host = 192.168.0.1
worker.worker1.port = 9009
worker.worker1.connection_pool_size = 5
worker.worker1.connection_pool_timeout = 300
Load Balancing exampleworker.list = loadbal1,stat1

worker.tomcatA.type = ajp13
worker.tomcatA.host =192.168.0.1
worker.tomcatA.port = 8009
worker.tomcatA.lbfactor = 10

worker.tomcatB.type = ajp13
worker.tomcatB.host =192.168.0.2
worker.tomcatB.port = 8009
worker.tomcatB.lbfactor = 10

worker.tomcatC.type = ajp13
worker.tomcatC.host =192.168.0.3
worker.tomcatC.port = 8009
worker.tomcatC.lbfactor = 10

worker.loadbal1.type = lb
worker.loadbal1.sticky_seesion = 1
worker.loadbal1.balance_workers = tomcatA, tomcatB, tomcatC

worker.stat1.type= status
Note: if one of your servers is a slow server then lower the lbfactor of that server
There are a number of Apache directives that you can configure in the httpd.conf file

Apache mod_jk Directives
DirectiveDescription
JkWorkerFiletells mod_jk where to find the workers property file
JkLogFiletells mod_jk where to write its logs
JkLogLevelsets the level of logging (info, error or debug)
JkRequestLogFormatspecifies the log format, below are the options that you can use

%b or %Bbytes transmitted (not counting HTTP headers)
%Hrequest protocol
%mrequest method
%pport of the server for the request
%rfirst line of the request
%Trequest duration
%UURL of the request with query string removed
%v or %Vserver name
%wname of the tomcat worker
%Rthe route name of the session

JkMountcontrol the URL matching and forwarding to the Tomcat workers
Example
JkWorkerFileJkWorkerFile conf/worker.properties
JkLogFileJkLogFile /var/logs/httpd/mod_jk.log
JkLogLevelJkLogLevel debug
JkRequestLogFormatJkRequestLogFormat "%w %U %T"
JkMountJkMount /examples/jsp/* worker1
Configuring SSL for Apache
SSL provides a secure connection between Tomcat and Apache, the steps involved in getting this working are

  • Install OpenSSL on your server
  • Check that Apache has mod_ssl support
  • Get or generate a SSL certificate and install it into Apache
  • Test the SSL-enabled Apache-Tomcat setup
To make sure that you have openssl installed and the mod_ssl modules installed in Apache run the following

Check foe OpenSSL# openssl version
Check for Apache modulemod_ssl# /httpd -D DUMP_MODULES
If any of these are not installed then I recommend you download the latest version and install as per the Installation guides.
There are a number of steps to generate a test certificate using OpenSSL

  • Create the configuration file for generating the certificate
  • Create a certificate signing request, this is what you send to the CA if you are buying a certificate
  • Remove the passphrase from the private key
  • Purchase a certificate from a CA or create a self-signed certificate
  • Install the key and certificate to the Apache server
Below are the steps to creating your own cert

step 1Create a working directory called certs
# mkdir certs
# cd certs

Create a configuration file (myconfig.file) as below
RANDFILE = ./random.txt
[req]
default_bits = 1024
default_keyfile = keyfile.pem
attributes = req_attributes
distinguished_name = Datadisk
prompt = no
output_password = secret
[Datadisk]
C = UK
ST = Bucks
L = Milton Keynes
O = Datadisk
OU = IT Consultant
CN = 192.168.0.1
emailAddress = paul.valle@datadisk.co.uk
[req_attributes]
challengePassword = secret
Create a random file called random.txt put a large number in it
step 2Now create the certificate

# openssl req -new -out server.csr -config myconfig.file
Two files should have been created server.csr and keyfile.pem
step 3Now remove the passphrase from the private key

# openssl rsa -in keyfile.pem -out server.key
step 4Now create a self-signed certificate
# openssl X509 -in server.csr -out server.crt -req -signkey server.key -days 365
Note: in a production environment the certificate signing request file generated (server.csr) is sent to a Certificate Authority and a certificated purchased
step 5Last but not least copy the server.key and server.crt in to the Apache conf directory
To setup the mod_ssl in Apache you need to perform the following in Apache httpd.conf file

include the httpd-ssl.confinclude conf/extra/httpd-ssl.conf
Load the SSL modulesLoadModule ssl_module modules/mod_ssl.so
SSLCertificateKeyFileset this attribute to the path to the server.key file
SSLCertificateFileset this attribute to the path to the server.crt file
Once all the above is completed you can now point your browser to the Apache server, hopefully the browser will pop up with a security alert (because of the self-signed certificate).
The only change to make the Apache-Tomcat setup is to change the attribute


....
JkWorkersFile ......
JkMount ........
Load Balancing
I will be discussing Tomcat clustering in a later topic will describes a more detailed viewing of load balancing and persistent sessions with-in-memory session replication but for this section I will discuss a basic load balancing solution.
The mod_proxy module can also be used for load balancing but will not be discussed here, the mod_jk module sup[ports load balancing with seamless sessions, it uses a simple round-robin algorithm. Each Tomcat worker is weighted in the worker.properties file which specifies how the request load is distributed between workers.
A seamless session is also known as session affinity or a sticky session. When a request is made any of the Tomcat instances is used, but any subsequent request will be routed to the same Tomcat instance. to keep the same user session.
The following steps are required to set up load balancing in Tomcat

  • Change the CATALINA_HOME in the Tomcat startup files to point to different locations for each of the Tomcat instances
  • Set different AJP Connector ports for the instances
  • Disable the Coyote HTTP/1.1 Connector
  • set the jvmroute in the Standalone Engine
  • Configure the Tomcat worker in the workers.properties file.
One assumption I will be making here is that all the Tomcat instances will be running on the same server
The first step is to change the CATALINA_HOME variable in each of the startup.bat (Windows) or startup.sh (Unix) instances

CATALINA_HOMEset CATALINA_HOME=c:\apps\tomcatA
Note: the other Tomcat instances would be tomcatB and tomcatC
Now in each Tomcat instance we must set a different AJP Connector port number (server.xml)

AJP Connector port8009" protocol="AJP/1.3" redirectPort="8443" />
Note: on the other Tomcat instances use ports 8010 and 8011
To avoid startup/shutdown port conflicts we must change each Tomcats worker server port (server.xml)

server port8005" shutdown="SHUTDOWN" debug="0">
Note: on the other Tomcat instances use ports 8006 and 8007
Because all the Tomcat instances will be running in conjunction with the load-balancer worker, it's possible that someone could directly access any of the available workers vioa the default HTTP Connector, by passing the load-balancer path. To avoid this comment out the HTTP Connector configuration of all the Tomcat instances (server.xml)

disable HTTP Connector
An important step for load balancing is specifying the jvmRoute. The jvmRoute is an attribute of Engine directive that acts as an identifier for that particular Tomcat worker. The attribute must be unique across all Tomcat instances, this unique ID is used in the workers.properties file for identifying each Tomcat worker (server.xml).

jvmRoutetomcatA" >
Note: the other Tomcat instances would be tomcatB and tomcatC
You will also need to comment out the Catalina Engine directive (server.xml)

Catalina Engine disable
Note: the other Tomcat instances would be tomcatB and tomcatC
In Apache's httpd.,conf file you need to add some load balancing directives, also make sure you have the module mod_jk loaded

httpd.conf directivesJkWorkersFile conf/worker.properties
JkMount /examples/jsp/* bal1
JkMount /jkstatus/ stat1
The last thing is to create the workers property file, i have already discuss this file above.

worker.properties fileworker.list = loadbal1,stat1

worker.tomcatA.type = ajp13
worker.tomcatA.host =192.168.0.1
worker.tomcatA.port = 8009
worker.tomcatA.lbfactor = 10

worker.tomcatB.type = ajp13
worker.tomcatB.host =192.168.0.1
worker.tomcatB.port = 8010
worker.tomcatB.lbfactor = 10

worker.tomcatC.type = ajp13
worker.tomcatC.host =192.168.0.1
worker.tomcatC.port = 8011
worker.tomcatC.lbfactor = 10

worker.loadbal1.type = lb
worker.loadbal1.sticky_seesion = 1
worker.loadbal1.balance_workers = tomcatA, tomcatB, tomcatC

worker.stat1.type= status
To test the load balancer and sticky sessions use the below JSP page (one for each instance), just place it in the webapps/examples/jsp directory.

jsp test page


Index Page by tomcatA


align="centre" border="1">


Session ID
Created on


Use the below URL's for testing, etc. Don't forget to play around with the lbfactor on each Tomcat instance to see what affect it has.

URL'shttp://local/examples/jsp/index.jsp
http://localhost/jkstatus